Sunday, December 11, 2011

Christmas Martini

This is my favorite mixed drink to make at home. I love how it tastes, how easy it is to make, and how versatile it is. It takes you through the holidays, straight to Valentines Day, and through the 4th of July! Just change out that sugar rim to match whatever season you will be serving it. I took these to my sister-in-laws this weekend. She had these very interesting martini glasses which hold ice underneath to keep them cold. I'm more of a traditional martini glass girl, but these were kinda fun too. I originally got this recipe of All Recipes, I added the sugar rim and if I don't have the same ingredients I tweak it a bit and it is just as good.

Ingredients:
2 fluid ounces citron or regular vodka
1 fluid ounce Cointreau or other orange liqueur
2 fluid ounces pomegranate juice
1/2 fluid ounce lemon juice or orange juice if you don't have a lemon, but lemon is best
2 Tbs. Sugar, I used green sugar, found in the cookie and cake decorating section

Pour sugar onto a small plate. Use a lemon wedge to wet the rim of the glass and then dip into the sugar. Pour the vodka, Cointreau, pomegranate juice, and lemon juice into a cocktail shaker over ice. Cover, and shake until the outside of the shaker has frosted.  Strain into a chilled martini glass to serve.
signature2

Friday, December 9, 2011

Emergency Snack Kit For The Car

I have started keeping this container full of snacks and mini waters stored in the back of the car. Inevitably we will be somewhere waiting for someone or something and the kids will be "starving" or "dying of thirst." Keeping the snacks in this covered container keeps them from getting all smashed and mushed. I may have to rethink this a little more come summertime, but for now its worked out perfect. I have lied down a large sheet of rubber cupboard matting or shelf liner if you will. It keeps this box from sliding around as well as groceries, milk, and especially my cakes!

 Pistachios, Macadamia nuts, squeezable applesauce, Cheez Its and Nutrigrain bars have been included this time. The nuts are a great snack for me in case I'm starving! And of course, don't forget the wet wipes for easy clean-up.
signature2

Thursday, December 8, 2011

Days 9-3 of The 12 Days Of Christmas For Teacher Gift

On the 9th day, my student gave to me...Granola!
On the 7th day, my student gave to me...A giftcard of music money! ($10 Itunes giftcard)
On the 6th day, my student gave to me...Pistachios!
On the 5th day, my student gave to me...A Notebook!
On the 4th day, my student gave to me...Many, many cups of tea!

signature2

Sunday, December 4, 2011

10th Day of Christmas Gift For Teacher

This is a cute little wooden tree, about 6" tall adorned with glitter and sparkles. These pictures are about all I have time for except to tell you that I made an amazing braised beef stew (ish) tonight. Unfortunately, I was too busy eating it to snap a picture, but I may post the recipe later. It was loved by all and as usual, the hubby complained, "Mom is such a good cook, only she never makes enough!" I heard a whole show on braising this week on Martha Stewart XM Radio. So, I didn't have a recipe, I just went off their general instructions. They mentioned you could go to MarthaStewart.com and type in the keyword "Braising" for more information. There was lots of information there and a helpful video, but it was not the same info from the radio show. Good luck!


signature2

Thursday, December 1, 2011

11th Day of Christmas For Teacher and A Gift For Lil

Well, well, well. Santa sent Lil a sweet bundle of gifts today. I was expecting, perfectly content, and overjoyed even, after opening that first box of cookie day cookies. As I carefully unpacked them I imagined all the kids back home at my aunts making the cookies, each with their own specific task. I could only hope that BioSus made them all keep washing their hands. The picture in my head is telling me she definitely did. A rush of sadness swept through me for missing that day.

Then, I opened the second box. I was expecting to find the ingredients to make a pumpkin pie, but it was so much better. To me anyway. It was beautiful, the most beautiful I have seen in quite some time. Home grown California produce. There were just picked avocados, lemons, peppers, and gigantic beautiful pomegranates. I pulled out the lemons and avocados and literally hugged them. I pulled them in right to my heart then right up to my nose. It was the best present, the best surprise. It was a little piece of home, I once took for granted. The sight of them left me feeling connected and happy. Thank you Santa :).

As promised here is the 11th day gift. Nothing fancy, just some extra cute gift tags...


signature2

Wednesday, November 30, 2011

12 Days of Christmas For Teacher

Christmas shopping is pretty much done, house is decorated, and presents are wrapped and under the tree. Of course the list never ends and even when I think I'm ahead of the game...I remember I still need to ship out gifts and cards. A while ago Chloe and I decided we would do 12 days of gifts for her teacher. They are just little tokens, some better than others. I only have about 6 of the 12 in mind. I did see a lady on Pinterest who did this, but she wrote cute little poems for each gift. You can check out her ideas here. I didn't use her gift ideas and I definitely don't have the time to be that creative. So I went with this simple theme of just writing the number and the name of the gift. We are going with her idea of "secretly" giving the gifts. Then Chloe can reveal herself on the last day. Here's is today's...

signature2

Friday, November 25, 2011

Hostess Gift

The first one in NC was a genuine success. Of course, we missed the fam and normal 80 degree temperatures in SD, but it was special nonetheless. Thanksgiving has come and gone along with Black Friday. Now as I wait for Cyber Monday, I'm putting away all things fall and hopefully by Monday the house will look like...as cousin Ian says, "Santa threw up in it." Thanksgiving was a great success and just in case I lose my directions for my superbly moist turkey that was perfectly cooked in my counter top roaster, I'm including a link here. That, my friends, is the solution to only having one oven when you are hosting the Thanksgiving dinner. BTW, the way you get dinner on the table at 4:58 when dinner is scheduled at 5:00, is to have a list...and follow it!

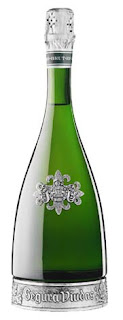
I also wanted to share with you the most wonderful hostess gift. It's so good in fact, you'll need to buy two. One for her and one for you. No one brought me this gift, but I did serve it yesterday. I found it on my own many years ago. However, I haven't had much luck seeing it around until now. It's Champagne...well not really. It's Cava. Cava is the term for sparkling wine in Spain. We can technically only call Champagne, Champagne. Champagne is the region in France that it comes from. It also refers to the method that is used to make it, méthode champenoise. In this method, the best method, the wine is fermented in the bottle,  the actual bottle that you purchase it in. Now, back to Cava and what makes this Cava so special is that it is made using the Champagne method. So you will get this beautiful bottle of sparkling wine that tastes great and is a great value. Your hostess will think you spent a fortune, and she will have the beautiful bottle to keep long after the wine is gone. She can use it for olive oil or dish soap if she gets one of those little pourer thingies, or she can make a bottle lamp like I did, if she's crafty.

Segura Viudas Reserva Heredad is a sparkling wine that always gets rave reviews. It is one of my personal favorites. Especially the price point. I got mine at Lowe's Foods for $21. Once upon a time they sold it at Trader Joe's. I would highly suggest putting in the effort to find some, you won't be dissapointed. Imagine what a great Christmas gift it would make!
signature2

Friday, November 11, 2011

Under $5 Felt Pennant Bunting Banner Tutorial

Pennant Banners are all the rage. Are they called banners or bunting? What is bunting anyway? Regardless of their name, they are so darn cute. I've really wanted to make one, but I don't have any fancy tools like a Cricut machine and I wanted this to be a quick, simple, and inexpensive project. Since I am hosting Thanksgiving this year, I decided on a Thanksgiving theme, to add some extra festiveness to my dining room. Speaking of Thanksgiving, am I the only one who is so sick of walking into any store to find something Thanksgiving related only to be inundated with Christmas stuff? For God's sake, I was starting to think I missed Thanksgiving altogether. But I digress, here is what you will need to do.
Supplies:
Your supplies will ultimately depend on what size flags and lettering you choose.
I needed 3 squares of fancy felt and 1 square of felt that has a sticky side.
Good scissors, I used fabric scissors for the felt
Printer
Yarn or anything you want to use to hang it.
Embellishments (optional)

First, decide on what size you want your pennants to be. My pennant template was 6.5"x 4.5" with 1/2-3/4 inch space at the top if you want to fold it over. You can search online for different sizes and shapes of pennant templates. Then print it out and cut it.

Next, print out your lettering. I used a Word document and printed out the letters for the word "THANKFUL" in Beach Extended font in the font size of 200. After it's printed carefully cut out each letter.


Trace those letters onto the paper side of the sticky felt. Make sure you place the letters backward or upside down rather when you trace.
Now, cut the letter out of the felt using your fabric or really sharp scissors. Peel off the backing and invert it and stick to pennant.
Once all your letters are done you have to decide how you want to hang it. I wanted to sew mine for a more finished look. That's why I added the 3/4 inch flap at the top. I folded it over yarn and sewed it. That way the yarn can move freely and I can move the flags closer together or farther apart. You can sew this by hand if you don't have a machine. You can also use ribbon or raffia to hang it. You could glue it I suppose, or you could leave the flap off altogether and punch some brackets though.
After I hung it I added these flowers that were on clearance at Michael's.

This was sooo easy and I was perfectly happy with it's simplicity. I can't wait to make one for Christmas, but not until Thanksgiving is OVER!
signature2

Friday, November 4, 2011

Week In Review

The week is coming to an end and can you believe I haven't been to Target one time???! Absolute madness, I tell you. Anyway, I really wanted to post some pics of Halloween, I know I am a bit late, but oh well.
My Zombie Cheerleader
Zombie Cheerleaders Pumpkin
Get this! Honey had to go get some new pumpkins on Saturday, because the ones I had gotten to carve had turned to mush. As we are carving them we notice they are green pumpkins, spray painted orange! Look closely at the star eye. What's up with dat?
Nash's Pumpkin (Grim Reaper)
Lil's Pumpkin
In other news, Chloe had a swim meet this past weekend. She did quite well. But...they don't really compete against each other. I mean they swim against one another, but times are only meant for personal growth. Each child receives a participation ribbon with their time. They really just want them to improve on their own time each meet. I get it, but for someone who is competitive, like Chloe, it really took a lot of the fun out it.

Other than that not too much going on here except that we are taking a break from piano for a month. The weather is cooling down, nights in the 30's and days in the 60's. And, I have found out that I am hosting Thanksgiving for my in-laws. Pretty funny, since I haven't cooked them a bowl of cereal, much less a freaking turkey! Should be interesting. My guest room is almost ready. I have been working on it for about a month and it is becoming a beautiful, romantic retreat. I don't have any guests scheduled, and I'd be surprised if I ever get one, but it's there if any miracles should happen. I will be posting pictures soon, I just have some finishing touches to make.
Have a great weekend!
signature2

Saturday, October 29, 2011

Butternut Squash Soup

It's nearly Halloween and temperatures have dropped this week. All over the country there are jack-o-lanterns being blanketed by snow. I can't seem to get enough of fall. I officially have a favorite season. Boots, scarves, changing leaves, red wine and soup are some of the things fall brings for me to enjoy.

Tonight I made some Butternut Squash Soup. I've had it many times in restaurants, but I have never made it myself. I knew I had a big container of pre-cut squash in the fridge I had to use, so I started browsing the web for recipes. BTW, I always buy the pre-cut butternut squash. I simply loathe having to deal with those suckers. Trying to peel and chop a raw one is like taking bananas from a monkey, not to mention the "glue" that is left on your hands. After looking at few different recipes I was able to put something together based on what I had here. I ended up with a soup that was flavorful and the perfect consistency.
Ingredients:
1 (32oz) box of pre-cut Butternut squash
1/2 large sweet onion or 1 small sweet onion
1 small Granny Smith apple
1 can chicken broth
1/4 block of lowfat cream cheese (optional)
2 cloves roughly crushed garlic, peeled
2 tbs. butter
Cardamon, nutmeg, salt, and pepper
2 tbs. EVOO

Preheat oven to 375 degrees. In a glass baking dish toss your two cloves of garlic and squash with EVOO and salt and pepper. Bake for 45 minutes, stirring about every 15 minutes.

Meanwhile, over medium-low heat, melt butter in a soup pot. Peel and dice your onion and add to butter. Peel, core, and dice your apple, add to butter and onions. Add a sprinkle of nutmeg and cardamon. Cook, stirring occasionally until the squash is almost ready. Remove from heat and allow to cool. Remove squash from oven and allow to cool slightly. If your blender can't handle heat, cool veggies completely.

Add squash, and apple and onion mixture to blender. Add your one can of stock. Puree until smooth.

Return to soup pot. Add cream cheese if desired and cook over medium heat until cheese melts and soup slightly boils. Taste and add more spices if necessary.

This serves 4-6 small bowls.
signature2

Tuesday, October 25, 2011

Homemade Halloween Costume Ideas

I love homemade Halloween costumes and with a little thought they generally pretty simple and a whole lot cheaper than paying for some run of the mill, off the rack get up. I posted some of these costumes last year, but I wanted to repost them for a little inspiration.

Zombie Rockstar
Made from stuff we had around the house and a purchased wig and face make-up.

Spongebob Squarepants
Painted on a box we were given from the hardware store!


Toilet Paper Mummy
I made this one in complete desperation. By the time he finished trick-or-treating all the tp had fallen off.
A Baby Costume
If I can make this so can you! I learned how by searching You Tube Videos
for tutu's, baby leg warmers, and hair bows. 
Homemade costumes are so cute people! This year let's strive to be more like our mother's and make them! My kids get a million compliments on their costumes when they are homemade. Chloe wanted to be an Angel this year and I was going to make it out of white tulle. My mind was whizzing with ideas and possibilities when she changed her mind. There are so many options for homemade costumes. You can make any costume into a zombie. You can use your kids old soccer or baseball uniform and make them into a zombie player. One of the only costumes I remember wearing as a child was when my aunt made me into a scarecrow. I think it had something to do with the fact that I wouldn't let her brush my hair. Her last minute costume idea and a pair of overalls and some straw turned out to be the most creative and memorable.
What's the most memorable homemade costume you have worn or created?
signature2

Monday, October 24, 2011

Remember Me?

I'm certainly not going to make any promises about future blog posts, but I'm here now, so lets get to it.
Life is fabulous here in North Carolina. The fall weather has me giddy every time I step outside. I even decorated the front door! It may be symmetrical, but I think it's darn cute! The children have adjusted better than I hoped. The public schools they attend here are much more rigorous academically than the ones in California. I suppose that's not really a surprise and it was a big part of the reason for moving to begin with. But I just wanted to let everyone know that sometimes big changes are scary, but we embraced it and it has payed off.

In other news, I've been sick all week and yesterday, between loads of laundry I crawled in bed and snuggled with my computer. Since being in NC, I rarely even turn on the computer anymore, because real life has taken over my virtual life! So I fired her up and spent the whole day perusing Pinterest. It was so much fun and so inspiring! I'm adding a Pinterest Button, so you can follow me to see what I'm fussing over.

Halloween is on the prowl and while Nash may be too old to Trick-Or-Treat, I think a T-Shirt from Kohl's that says "Costume" and a scary mask will suffice for him to pass out candy. Chloe on the other hand is giving me trouble-shocker! Just like last year she can't decide what to be, so I have to put my foot down. She was choosing between an Angel costume, that I was going to make, or a Zombie Cheerleader. I went with cheerleader because we bought a $12 hideous cheer costume from Marshall's last month and I am eager to slash it up!
signature2

Saturday, September 24, 2011

Milk Free Strawberry Cake

First Birthday Cake
I will make a brief appearance today to share with you a cake I made last weekend. I made this at the request of my sister-in-law for my nieces' first birthday party. Her children both have severe milk allergies. So she asked if I could just use store bought strawberry cake mix and Duncan Hines Vanilla Frosting. Both are milk free.

Let me tell you, I'm not used to working with gooey soft store bought icing, so it was a bit of a challenge. Her colors were blue, pink, and black and white. This is what I came up with. It's not my best work, but she was really happy with it. I simply removed the top layer for the birthday girl so she could dig into it and we cut and served the bottom layer to the guests. The birthday girl was so cute, she made a giant hole through the side straight into the middle like she was trying to eat her way to China! I think she liked the strawberry filling!

The black letters are her name that went all the way around the cake. In hindsight, I would have done that differently, because you have to turn the cake to see her full name.


I used Fonderific Fondant in white because it was the only brand I could find that was milk free. I used Wilton Sky Blue and Duff's Electric Pink to color the icing and fondant. After I cut the letters, I used a food safe marker to color them black. It was a lot easier than trying to make black fondant.
signature2